SSH Key-authentication
In this article, I will attempt to explain the process that happens when authenticating ssh to a server by using keys.
| Keyword | Definition |
|---|---|
| Client | The device that connects and tries to become authenticated. |
| Server | The device that is being connected to and will be in charge of authenticating the client. |
How to configure passwordless SSH
First of all, we will need a key-pair. To generate the keys we use the following command:
ssh-keygen

# We can specify the asymmetric algorithm like this:
ssh-keygen -t rsa
After generating your keys, they will be located in your user-directory under the .ssh folder (unless you specified anything else when creating the key). In this example, I have used the RSA algorithm.
Now, the public key is located in: user-directory/.ssh/id_rsa.pub
If both the client and server is on Linux, you can simply copy over the key with the command:
ssh-copy-id user@serverIf not, you will need to connect to the server you want to configure. When connected, append the key to the authorized_keys file located in user-directory/.ssh/authorized_keys
On linux you can:
echo <public-key-here> >> ~/.ssh/authorized_keysNow, lets look at how this works
How does SSH key-authentication work?
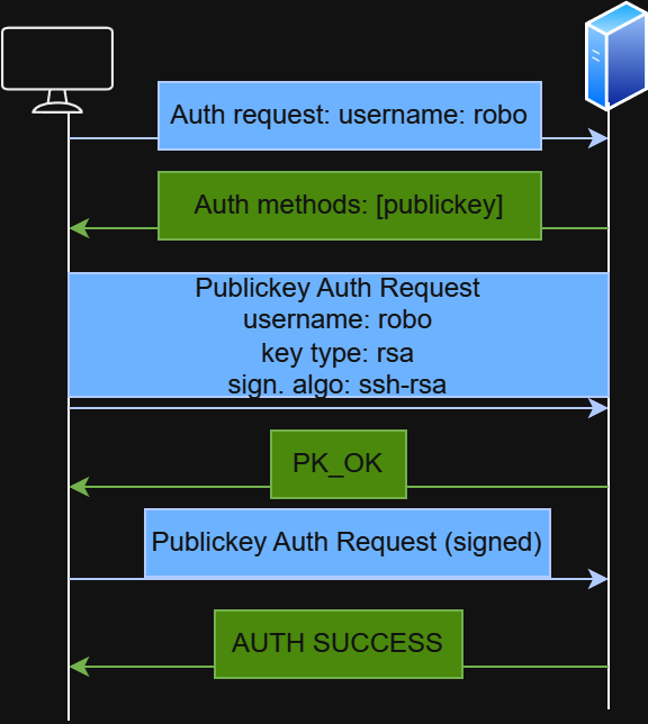
Step 1: Auth request
The client sends a authentication-request to the server, where it's specifying the user to authenticate with.
Step 2: Auth methods
The server responds with the available authentication methods. The best-practice in terms of security is to only allow authentication with publickey.
Step 3: The client sends the Publickey Auth request
In this request the client includes the public-key and session-data like username, key type and signature algorithm.
Step 4: The server verifies the public key.
In this step, the server checks it's authorized_keys file to check if the public key is allowed. If so, the server responds with a PK_OK message. However, the client isn't verified yet! The public-key is, as the name suggests, public. Everyone could have tried to authenticate with this key, so we need to verify to the server that we own the private key.
Step 5: Signed Auth request
Now, the client sends the same authentication request as before, but this time signed. A digital signature is computed over the session data using the private key.
Step 6: Final authentication
The server will now try to verify that the client has the private-key. If the server is able to verify the signature with the public key, it can successfully authenticate the client.
For more information, check out these articles:
- TBD: Article about digital signature algorithms
- TBD: Article about hashing
- TBD: Article about asymmetric encryption (or encryption in general)